How to create a blog post 2
This is an updated version of this post.
In this post, I'll explain how to use jekyll to create a blog post on
this site.
I've set up the site to allow for multiple authors, so there will be
an additional frontmatter tag required at the front of the post
compared to most jekyll blogs.
First of all, I highly recommend everyone posting on this site use
markdown syntax for their blog posts.
They have a significant benefit of being readable (and writable) as
plain text making your job in creating blog posts much easier.
Markdown files should have the suffix .md and, for blog posts,
should be located somewhere in the _posts directory or one of its
subdirectories.
If you'd like to keep all of your posts in one place, then I recommend
creating a subdirectory using your username or authorname and storing
all posts you create in it.
In my case, all of my posts will be found under _posts/jspjut/.
The next thing to learn is that post titles should generally be found
in the file name.
Additionally, all blog posts begin with the date in YYYY-MM-DD
form.
Since I gave this post the title of "How to create a blog post" my
filename is therefore, 2014-10-17-how-to-create-a-blog-post-2.md.
There is a command line tool that you can use if you have ruby
installed on your machine to help you create a blog post file with the
right filename and some starter frontmatter as follows:
rake post title="How to create a blog post 2" author="jspjut"
Once you create your blog post file, you will want to ensure the frontmatter is structured correctly at the top. note On my post it looks like this:
---
layout: post
title: "How to create a blog post"
description: ""
category: "tutorial"
tags: [tutorial, blog, jekyll]
author: jspjut
---
{% include JB/setup %}
For blog posts, layout should always be post. title should be
whatever you choose as the title of your blog post, and if excluded,
will come from the filename.
description could optionally be a description of the post and
tagline allows you to add a subtitle or tag to your blog post.
category should be a category for your post. For example, if you're
working on a particular project, it would make sense to put that as
your category.
Since this post is a tutorial post, I've placed it under that
category.
tags allows you to provide a list of tags that can be used to find
your post later and cross reference posts.
Finally, author should include your author id and will correctly
attribute your blog post to you on the web site.
Markdown
Markdown will generally allow you to do exactly what you want to do when creating a blog post. The first most important thing is that you can just start typing content, and paragraphs will be separated by two new lines. A thorough markdown cheatsheet is available that will show you everything you might want to know. I'll repeat a few of the most common things I use here.
First, code and syntax highlighting are easy to produce. If you want highlighting here, then you can use triple backticks (```) to begin and end a code block. If you want code to be inline, then use a single backtick (`) to surround your code. For example:
This is an `example`
Generates:
This is an example
If you type the following:
```
This is a block of code I want to highlight as text
Nothing much is going on here
   Spaces    count
```
It generates:
This is a block of code I want to highlight as text
Nothing much is going on here
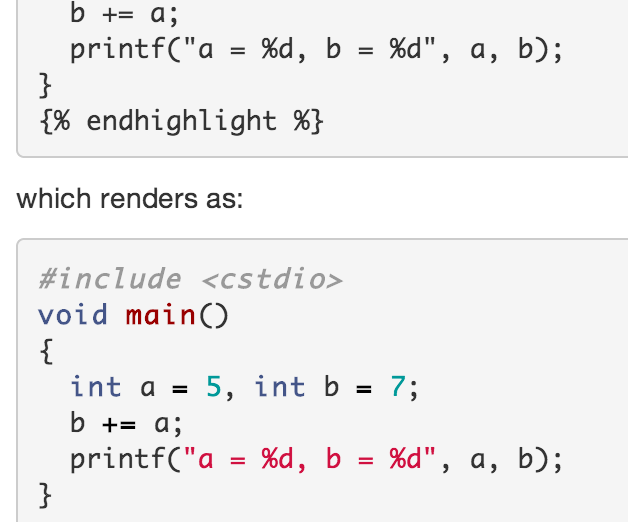
Spaces countIf you want to enable code highlighting for a given language, then you should do something like the following C++ example:
```c++
#include <cstdio>
void main()
{
  int a = 5, int b = 7;
  b += a;
  printf("a = %d, b = %d", a, b);
}
```
which renders as:
#include <cstdio>
void main()
{
  int a = 5, int b = 7;
  b += a;
  printf("a = %d, b = %d", a, b);
}
Images
There are some times where I feel like including an image with a post. As an example, I've taken a screenshot of this post as I was working on it to include here. The syntax for including an image in your markdown is as follows:
which shows up as
The image attempts to fill the width of the screen, so on a PC this image will appear greatly zoomed in, but other devices might show the image smaller. Remember that you need to add the image to the repository in addition to your blog post before they will be seen.
Submitting your post
The final step once you've created a blog post is to push the post to
github so that github sites will include the post on the web.
If you already have a local repository set up, you can just
git add . (assuming you have only changed things you're confident
in, such as your new blog post), then git commit and finally git push.
If all went well, then your blog post should be live on
within about 10 minutes.